Tiling Textures
 |
| Final Edited |
This final project or assignment is very beneficial for the CAGD major because it prepares you to create a new form of material that you can use in majorities programs. You can use this method to import into Painter and Unity as a form of material for future projects. I never considered myself using this method until recently for one of my projects related to Unity for another class. We need to create four tile textures for this assignment, including a demo and three of our own pictures. You would need to use Photoshop because you will use offset, clone stamp tool, patch tool, and vertex mask with the brush. From my own pictures, I use levels to make more contrast for a more defined texture without any reflection of the sun. Afterward, exported and imported into Unity as a material to verify the tile texture is flat, not bumping. Back to Photoshop, we need to convert it into a diffuse and normal map to give more depth within the surface for Unity or any other programs.
 |
| Unity |
 |
| Levels |
 |
| Normal Map |
Hyper-realism
 |
| Reference |
For this particular assignment, you had to be very created, curious, and imaginative to construct an unrealistic merging of multiple pictures into one as an antithetic reality. I had an idea of converting someone walking from the distance facing away from the camera, a picture of an open door, and another picture of a different atmosphere landscape. I had many options of what location to pick from and what type of atmosphere to pick in the morning, afternoon, evening, or night hours of the day to certify the light source. It wasn't easy to portray a fictional setting into reality, even though it might be possible to be true. I had to use lasso, dodge and burn, Hue variations, exposure to the light, and much more for this assignment. It was fun to make even though it was difficult to cultivate without any errors from blurriness, lousy light source, and primary.
 |
| Final Edited |
Portrait
 |
| Original |
It was charming to work with my brother on multiple occasions, especially this portrait, in finishing this assignment. It was my first time seeing him happy and enjoying himself. What he loves without hesitation or any concerns relating to his health. the only tricky choices I had thought out this assignment is either leave it as it is or invert it into black and white levels, contacts, and dodge and burn. I have no other words to describe the process as it was a splendid time capturing a moment in the life of happiness and freedom from the world itself.
 |
Final Editied
|
Panorama
Panorama is capturing
a specific moment into multiple pictures merged into one photo. The concept of
understanding a sight is crucial to understanding the shift from the central (or
single-point) perspective to the "multi-perspective" of the panorama.
For this assignment, I had almost to take seven photos of capturing a person's mood
of the outdoors. From the left side corner of an eye to the right side of the
other eye point of view. Below are the seven pictures I captured and merged
them in Photoshop:
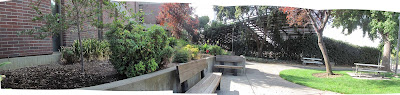 |
| Original Merge |
At first, I wondered if I had gotten the right amount to
merge into one without any cap in between. This image was my second option because
it sews together without complication from the first option. It wasn't easy connecting
the pictures as lining them without any application. I was confused in why I couldn't
lasso the space and content-aware fill; it did the work but with the wrong proportions.
So I had to restate everything because it damaged the original image, which I forgot
to duplicate the picture as a copy just in case. I start adding masks for every
image to combine the lineup of the photos without leaving any empty spaces with
a brush. Afterward, I use either the lasso to fill content-aware or the stamp to
enhance the image with error proportion. Crop the image if necessary to improve
the image size. I use multiple applications to help enhance the saturation with
levels, exposure, and turning the idea with black and white. I like these final
touches, and here is the result.
 |
| Final and Edited |
HDRI
I knew the difference between a standard image and an image
with a high dynamic range. At first, I was confused about the meaning of this
assignment and not having the capacity of my camera not having the potential of
confounding HDR by itself. To successfully obtain the basics of having multiple
exposures (over, standard, and under) of a single composition, I had to take
several pictures and merge them into one with the help of Lightroom Classic.
Here is more than one picture I took in the golden hour in the sunrise atmosphere
and a screenshot I edited in the Lightroom Classic.
 |
| Standard |
 |
| Under Exposure |
 |
| Over Exposure |
 |
| Lightroom Edited |
For the final editing and last touches, I open Photoshop and
define the saturation of exposure light. I used some applications I used from
the previous assignment to capture the essence of the HDRI. At first, I put
some luminosity masking for each color: red, blue, and green. I use the curves
application to saturate the colors within the image to definite form light to
dark and reverse to eliminate the sunrise with the three colors. I also use the
vibrance application to captivate the central as being the brightest from the
edges into darkness or shadows. Underneath is the final and edited image I have
created for the assignment of HDRI.
 |
| Final and Edited |
Things
Photograph "things" in a visually exciting way. "Things" can
be more minor parts of a larger whole, such as a light bulb amidst a string of
lights or a demonstration of the symbolic relationship of nature, such as a bee in flower. This assignment was interesting in capturing the littlest things into the big picture. This assignment is one of my favorites because anything can become a subject for the photo. The image below is my
favorite I took for this assignment nature is calling:
 |
| Original |
I used some final arrangements to saturate the blooming
flower and the bee. Because with the raw image, the bee would be out of focus
as a blur pixel. I only use two different applications to help capture the idea
into life. First, use the application of the level to saturate the darkness and
the brightness of the picture. I consider the background to be darker than
the front center of the main focal point. Lastly, I also use the Hue/Saturaturation
in defining different colors in bringing green and blue to capture the contrast
of the bee from the plants. Below is my final editing for this assignment:
 |
| Final and Edited |
On the Edge
 |
| Original#1 |
 |
| Edited#1 |
We needed to convert a
single image into black and white for this assignment and Dodge and Burn. The focus is on having
the subject on the edge of the frame. The photos below are my first attempt: In the beginning, I was so sure if I used the
correct composition elements of using dodge and burn. In my mind, I thought the
image needed a little more depth on the flower; I generally ignored the rest. I
wanted to make the" flower" pop up from the background wasn't I didn't realize how
blurring it was at the last minute. I took multiple photos of the same subject,
yet I picked the only one which covered the assignment. Lately, I wasn't
very convinced it was the right decision to choose this image from the others.
I might as well change my decision and conduct a better interpretation of the composition
of the subject in the edge.
 |
| Original#2 |
 |
| Final and Edited#2 |
This was one of the best decisions by
constructing a second concept "on edge" assignment. Sadly, this wasn't what I turned
in for the final grade. I use a black and white layer by interrupting the background
dark while the flower constructs brightness. I put a minimum of saturation by exposing
a small amount.


.gif)

Comments
Post a Comment