Final Game Scene
The Google Slides above represent the dedication I resent consider as what I can actually do. I have been having difficulties with the module modeling for this entire project. Unfortunately, I only completed the first UV Set on time because I had errors throughout Maya and Unity. I tried my best to accomplish at least one of the buildings within my capacity and understand the concept of doing module modeling differently. To understand the frustration and the progression, I'll deliver a post-four-week dedication and patience throughout this project.
Week 4 Post
The final week wasn't anything I had ever expected. The only way to proceed is the method is to divide the objects of four into one layout or just decrease the size of the object UV so it can fit into the scale 0 to 1. Exporting into Painter was divided into groups because I wasn’t able to use multiple layers without having them colliding with one another. In Painter I was the substance material default and just adding dirt is it can look realistic in Unity. I exported into two different file textures which one was in aiStandardSurface for Maya and URP for Unity just in case. It was my very first time using terrain and adding models, but as a module model idle. Without knowing how to model modeling, I had to separate into groups. As I did export it into Painter. If I hadn’t and just imported as a whole the material would collide into each other.
Week 3 Post
Week three was the most frustrating week I can ever encounter. By the way, this project wasn't the only one I had to accomplish for the final from the other classes. Besides the stress gathering towards the end of the semester, it wasn't as related to having health issues merging in from every stress level increasing. I try to minimize my work efforts throughout this week. Not to mention it was the week Maya was a pain in the neck with all the crashes and freezing into restarting my whole computer, the waste of time I encountered. UV editing wasn't my friend as lovely as before. The easier way in UV editing is by making some of the objects into planer or automatic before cutting, unfolding, and having a layout to 0 to 1 scale. I had to minimize the scale within the four corners of the scale.Week 2 Post
Entering the second week, I was hype and ready to work to start modeling. UV Set #1 is the first building I need to begin with. I was confident and prepared to accomplish this within this week, but I was wrong. I got stuck in module modeling and wasn't sure if I was doing the right thing before continuing. By this week, Maya started to crash me and sadly lost progress without having any clue the situation it was going to acquire. So I had to restart from the beginning as opening up a new project and doing the process again. The time wasn't on my side, so I had to pause and continue to the following week.
Week 1 Post
 |
| References |
This week was just finding some references in considering what I can construct within the four-week final project. I will always overthink myself and guess if I would ever complete the previous assignment or project in time. I chose Forge of Empire because it was more similar to the building I had seen before as being most noticeable as a mobile game. I decided on two buildings, a centerpiece, and props to create a demo game scenery.
Module Modeling & Fire Hydrant
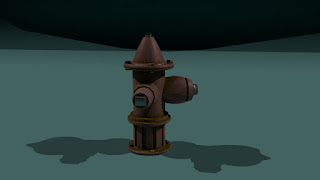 |
| Fire Hydrant Render in Maya |
Unfortunately, the module modeling wasn't my cup of tea.
Even though there were videos to follow to construct the firehouse, I still
find it challenging to follow along. The fire hydrant was my first time using
Boolean union, combining and merging the vertex. I had to try it again more
than twice from the beginning to better understand it. While doing it really
affected me throughout the progress in constructing the firehouse and importing
them into Unity. I'm the person I must know before proceeding to the following
object. Clearly, I need to manage time and practice more
towards module modeling. I found out not everything was considered easy as accepted
from my previous 3D Modeling class before transferring to Chico. I really didn't
have the time to import it into Unity, but I tried to render it into Arnold in
Maya even though I wasn't recommended for this project. In doing so, I hope to try
this project again without being under pressure and try to figure it out before
entering into a higher class as a refresher.
Room Assignment
 |
| Reference |
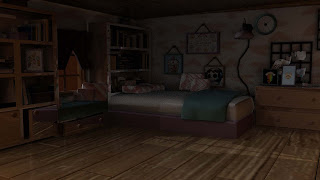 |
| Beauty & AO Render final editing |
The room assignment was the hardest so far by completing it
between almost 50,000 faces without involving the smooth tool. I had to delete
some of the faces that weren't noticeable to make it less lag and crushes. The crushes
were the worst which I was getting frustrated as being stuck in a loophole. So I
had to delete my progress of only the object, and the good thing it didn't
provide me to delete the whole project from the previous projects from
different aspects. I didn't use Painter for this assignment because it wasn't
necessarily having; I wanted the atmosphere in pastel colors rather than a realistic
aspect. Creating the plant was the
hardest of all the objects in the room because I was overthinking if it was
revolving everything into one or dividing it into two. The two would be the base
of the plant and the leaves with curves and loft. I extracted the curve and the
surface to move the object around without changing or mixing the geometry,
which caused the leaves to be dysfunctional as not being placed inside the plot.
Lastly, the lighting for the room I had maneuvering the light coming from the window
and inside the space. For this assignment, I also us beauty and AO for rendering. I also used Photoshop to emerge both renders into
one picture for the final editing.
Chessboard Assignment
Overall, the chessboard assignment was the easiest, far from all the previous. This assignment wasn't a hassle or stress from the props
assignment. For this whole assignment, I used the orthographic view to help me
create all figures of the chess pieces with the help of the curved line and some
polygonal objects. With indulging chess pieces, the knight was the only piece that
needed extra work involving moving pivot points and a combination of snapping. I
needed to connect the knight's head to the base as one without any geometry
error, or else another starts over. Combination, connecting, and merging pivot
points was something knew I never considered doing with inverting into a whole.
For the UV editing, I had to divide the chess pieces into three groups to add
raw materials from Painter. By doing so, I also made a chessboard, table,
drinking glass, lantern, and a chess timer which helps the scene more realistic.
For the rendering, I had to use three aspects of Arnold to captative the
saturation and the exposure to the angel picture taken in Maya. I use beauty,
wireframe, and AO to captivate the Arnold missing link to make the scene realistic.
Combining these three renders using Photoshop to merge them into
one image for the final editing.
 |
Beauty, AO, Wireframe, and Photoshop
|
Props Assignment
 |
| Barrel & Bucket in Painter |
 |
| References |
Considering the barrel assignment of using some instances
function, I never imagined UV editing and Painter. UV editing is an
eyesore because having one misplace inter loop, face, vertex, edge, and even
the wrong geometry can cause everything to waste time and affect a start over.
With this method, I always double-check before starting UV editing, and if I
found one mistake, I had to restart from the beginning. The props assignment
was precisely the situation for UV editing and curves, revolve, loft, glass, and
lighting. We had to replica a lantern, drinking glass, flour sack, potion
bottle, a bucket, and a barrel. I use multiple references to plan out the resources I need
to create a 3D visual world into the real world. I first started with curves and the orthographic perspective in either the x-axis
or the z-axis for a better view to construct a different geometry than the default.
If the curve function isn't the right choice, I use the loft method and extract
the face into the create form of the object. The potion bottle and the drinking
glass are another situation with another second step. It is a function within the aiStandardSurface to transform into a glass; at first, it would seem the object
was visible, but in Arnold, it seems to look into the mirror with the refection
of its surrounding. I am finding the best lighting angle with directional light,
with the skydome contracting each other with Arnold.
 |
| Props Render |
Barrel Assignment
The barrel assignment was the first difficult assignment I had
ever experienced in Maya. For this project, I didn't use any reference image to
replica a standard barrel which was effortlessly captivating by memory to
something known. I had to learn and use new functions in Maya in captivating a
realistic-looking barrel with natural wood and metal. This specific
function is UV editing, Painter, low and ID, bevel, extracting, and lattice.
 |
| Barrel in UV editing |
 |
Barrel in Painter
|
For the first step, you need to create the outer boards, the
rings, and the cover for both the top and bottom. Need to extract to have depth
and have the specific object required to transform the boards as a pop-up
version from a 2D to a 3D. While extracting, I also needed to bevel the edges;
the bevel is too definite for the edges to smooth the corners without losing
any definition in the smooth mode. Later the barrel needs to be looked like an
authentic barrel using lattice around and wide of an accurate barrel.
 |
| Barrel_low |
 |
Barrel_ID |
In the second step, you need to use UV editing to captivate
the transformation in adding color or image in the right places without any flaws.
Especially if you want to use natural materials, you will need to use Painter to
add metal, dirt, and any other realistic material. By doing so, you need to convert
everything into groups under the names of "_low" and "_ID" to identify them in Painter. Lastly, it would help if you used aiStandardSurface to place a new material to add a base, metal, rough, and standard raw elements used in Painter. The barrel looks more realistic with these elements—the final rendering captures the almost 3D object into the real world.
 |
| Render |
Primitives Assignment
Primitives' assignPrimitives'e first "project"
through "t the s "master, even though I had taken a similar class from my previous
school. At first, it was fun and exciting to create a replica of the reference image
converting into Maya. I had several ideas of references to choose from but
wanted to have fewer elements on the picture because I only knew the minimum knowledge
of recreating in Maya. I wanted to be less realistic in a fantasy environment; I
wanted to experience peaceful scenery.
 |
| Reference Image |
I ran into errors and obstacles
in creating an object throughout the assignment, especially the bench. I forgot how to bend to create an
arc for the bench's legs, so Ibench's re-watch and remember if I missed a step by
failing to put inter loops around the rectangular and put a deform function of a
bend. I also forgot to delete history to move the arc without losing the
shape connection. At the same time, Maya was getting to lag because I duplicated
multiple leaves by grouping them without realizing it was a single tree that
was supposed to cut half, not a whole. I didn't know how they didn't get them and
delete the facing that wasn't in sight sowasn'tMaya could smother. I also
forgot how to use the skydome and significantly add an image of the sky—also, failing
how to render in Arnold capturing the colors between the light source in the
objects themselves. The photos would either become pitch black or bright blue
from the skydome. Although it was the first assignment, I now know how to
capture all the elements of neutral color without any errors.
 |
| Final Render Image |


.gif)

Comments
Post a Comment